Finding old photos is like discovering a hidden treasure. The faded edges, bent corners and all the memories within them are too valuable to lose. In the past, fixing up pictures like this took many hours of careful, by-hand editing. But Google Nano Banana Pro has dramatically altered this, giving you a simple, effective way to make your special memories new again.
Why Google Nano Banana Pro is the Go-To Tool for Photo Restoration
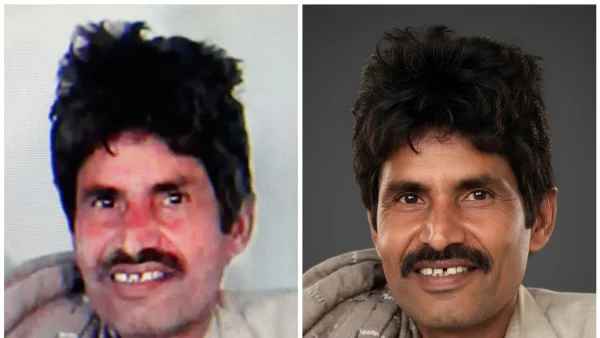
Nano Banana Pro uses this advanced diffusion modeling and context-aware reconstruction to work on old photos. This means it looks at every tiny part of the picture, guesses what’s missing, and rebuilds the textures to make the restored image look as it originally would. It’s better than many other programs at understanding light, skin colour, shadows, and the balance of colours, so it doesn’t create overly sharp or artificial pictures. It’s especially good at fixing old portraits and making them look natural.
Even badly damaged photos can be dealt with by this program. Tears, creases, blotchy areas, and faded backgrounds are all rebuilt automatically. For pictures from the 70s and 80s which often have a yellow or orange colour to them, the program adjusts the colours without making the image look fake.
How to Use Google Nano Banana Pro Effectively
To get the best results with Nano Banana Pro, you need to give it very specific directions. Here are some examples of how to write those directions, for different types of fixing:
1. *To generally fix a photo: “Fix this old photograph with colours that look natural, clear details and correct light. Get rid of scratches, marks and fuzziness but keep the original look of the picture.”
2. To fix a portrait: “Gently rebuild the face, keep the normal texture of skin, keep the original expression, and fix damaged bits without making it too smooth.”
3. To correct the colours: “Get rid of the yellow colour, make the difference between light and dark areas bigger, brighten and darken highlights and shadows to balance them, and make the colours look like film.”
4. To fix a very damaged photo: “Rebuild any bits that are missing or torn, recreate textures, get the face details back accurately and keep the old-fashioned feeling of the picture.”
You can also add more artistic directions like “keep the graininess very small” or “keep the picture looking like film.” Being specific is the most important thing to getting the results you want, consistently.
Expert Tips for Authentic Restoration
To make sure your restored pictures still look true to the original:
*Don’t overdo the improvements: Though you might want to remove all graininess for sharpness, older pictures naturally have some texture. Keeping a little graininess maintains their old look.
*Look at colour examples from the past: For very old family photos, match the restored colours to pictures from that time. Colour schemes in the middle of the 20th century often had softer reds and duller greens.
*Keep the original shadows: Shadows give a picture depth and hold it in place. Removing too many shadows or bright spots can flatten the image. Let the program fix the damage, but keep the original lighting.
*Look at the edges and details in the background: The program usually fixes most things automatically, but things in the background might look too perfect. Change your directions to “keep imperfections in the background” if necessary.
Common Mistakes in Using Google Nano Banana Pro
People new to this often make the mistake of giving simple directions like “fix this photo”, which can lead to the program smoothing too much or changing the colours unnaturally. Using portrait directions for landscape pictures can change the shapes of things. Sharpening too much makes a digital look instead of an old-fashioned one. Always look at the original and the fixed version together to be sure the feeling of the picture hasn’t changed.
Nano Banana Pro is as good as it is because of Gemini 3 Pro’s ability to understand many types of information at once, which improves how it deals with texture, how accurate the colours are, and how much detail it keeps. Its ability to follow specific directions like “remove dust”, “unfold”, or “remove lines” makes it better than other programs.
A Step-by-Step Guide for Best Results
1. Start with the best possible image: Upload the highest quality copy of your picture. If you are taking a picture of a physical photo, try to avoid any shining light on it.
2. Give clear directions: Avoid giving instructions that say one thing and then another (for example, “make it look 100 years old but also brand new”).
3. Use ‘negative’ directions: Tell Nano Banana what not to do (for example, “no cartoon-like effects”, “don’t make it too smooth”).
4. Do it in two steps:* First, do a general restoration, and then give more specific directions (for example, specifically tell it to fix faces or colours).
Restoring photos is about much more than just fixing pixels; it’s about respecting memories that could otherwise be lost. With Google Nano Banana Pro and carefully written directions, you can bring old pictures back to life while keeping their history and charm.
For people with boxes of old photos waiting to be restored, this program is a gentle but accurate way to begin. It brings back not just the pictures themselves, but also happy memories from the past.